Showing posts with label IT. Show all posts

Tuesday, February 8, 2022

How to fix database error in sql 2014 with DBCC


first we need to use below command to check what table error.

DBCC CHECKDB (UAT) WITH NO_INFOMSGS, ALL_ERRORMSGS

Next  we will see which table got error then we need to change database to single user mode in database properties or can use command below:

ALTER DATABASE UAT

SET SINGLE_USER;

 Then time to repair table :

DBCC CHECKTABLE('AT_INOUT', REPAIR_ALLOW_DATA_LOSS)

And then after repair all table error we need to use the first command again to make sure all table was repaired.

DBCC CHECKDB (UAT) WITH NO_INFOMSGS, ALL_ERRORMSGS

Then we need to check log database is it big or not.? if it big we can shrink it by below guide:

Right click -->Task-->Shrink-->File-->then click OK.


The L2TP Connection Attempt Failed Because the Security Layer Encountered a Processing Error Fix

 Are you using a VPN (Virtual Private Network) to access certain websites? Then, you may come across an error “the L2TP connection attempt failed because the security layer encountered a processing error” when you try to make a VPN connection. L2TP is a well-known connection used for encryption and protection of VPN. Some of the reasons why you may see this error are when the Microsoft CHAP v2 protocol is disabled or when the PPP settings are not configures properly. However, the good news is, the “the L2TP connection attempt failed because the security layer encountered a processing error” issue can be resolved. Let’s see how.

Method 1: Uninstall latest security updates

Recent Update may have caused this issue while breaking your VPN. for fixing this, you can uninstall your recent update.

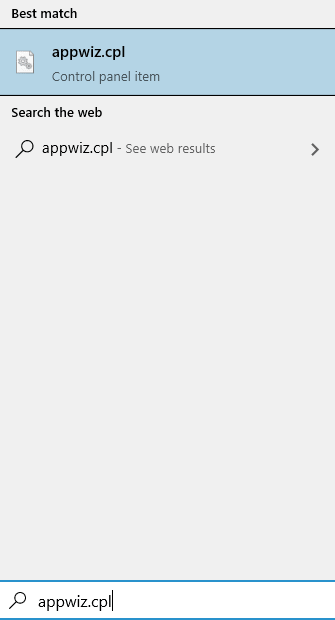
1 – Search APPWIZ.CPL in Windows search box and click on it.
Appwiz Cpl Min


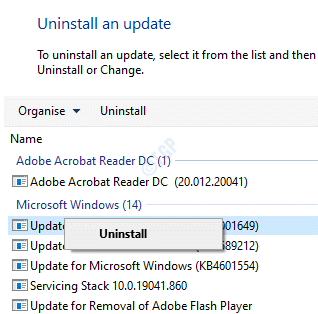
2 – Now, Uninstall most recent Microsoft Windows update by right clicking on the most recent Microsoft Windows update and then clicking on Uninstall.

kb:5009543 for Windows 10

kb:5009566 for Windows 11
Control Panel Programs And Features Uninstall An Update Right Click Uninstall


3 –Restart your computer

Method 2: Turn on the Microsoft CHAP v2 Protocol


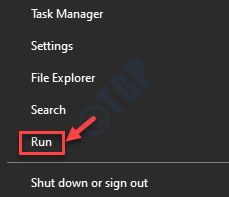
Step 1: Right-click on Start menu and select Run to open the Run command window.
 

Start Right Click Run


Step 2: In the Run command search box, type ncpa.cpl and hit Enter to open the Network Connections window.
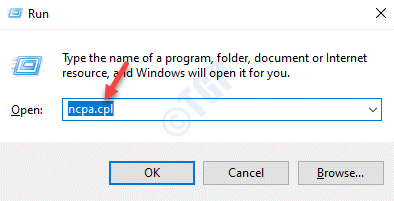
 

Run Command Ncpa.cpl Enter


Step 3: In the Network Connections window, right-click on your VPN connection and select Properties.
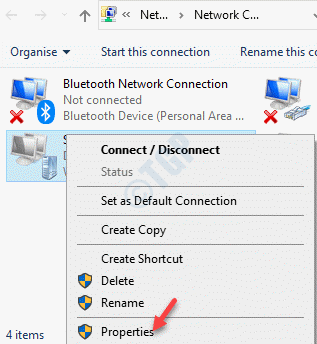
 

Network Connection Vpn Right Click Properties


Step 4: In the VPN Properties dialogue box, go to the Security tab and select the radio button next to Allow these protocols option.

Now, make sure that the box next to Microsoft CHAP Version 2 (MS-CHAP v2) is checked.

Press OK to save changes and exit.
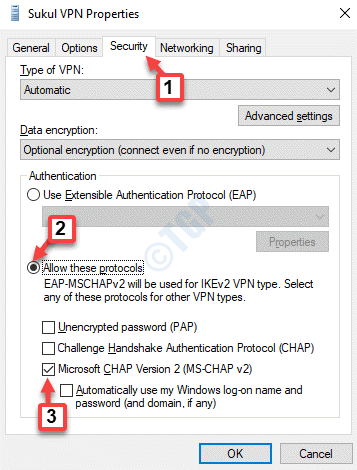
 

Vpn Properties Security Allow These Protocols Microsoft Chap Version 2 (ms Chap V2) Ok

Now, try connecting to the VPN and you should not experience the “L2TP connection attempt failed” error again.


Method 3: Turn on the LCP Protocol Extensions


Step 1: Press the Win + R keys together on your keyboard to open the Run command box.

Step 2: Now, write ncpa.cpl in the Run command search field and press OK.
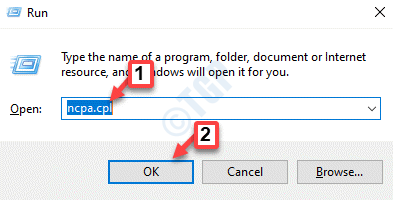
 

Run Command Ncpa.cpl Ok


Step 3: In the Network Connections window that opens, locate the VPN, right-click on it and select Properties.


Network Connection Vpn Right Click Properties


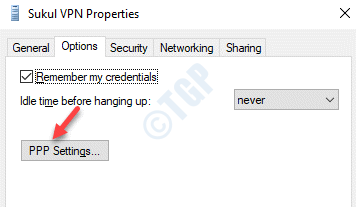
Step 4: This time, go to the Options tab in the VPN Properties window and click on the PPP Settings button.
 

Vpn Prorperties Options Ppp Settings


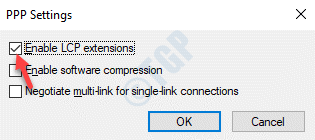
Step 5: Next, in the PPP Settings dialogue box, check the box next to Enable LCP extensions.

Press OK to save the changes and exit.
 

Ppp Settings Enable Lcp Extensions Ok


You can now try connecting the VPN and it should get connected without showing the error.

Method 4: By Restarting IPSec Service


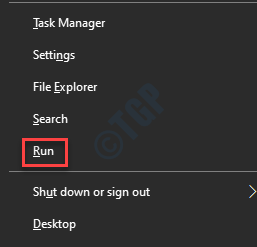
Step 1: Press the Win + X hotkey on your keyboard and select Run to open the Run command.
 

Win + X Run


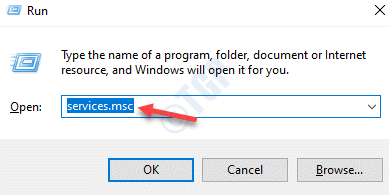
Step 2: In the Run command window, type services.msc and hit Enter.
 

Run Command Services.msc Enter


Step 3:This will open the Service manager window. Go to the right side of the Service manager and under the Name column, look for IKE and AuthIP IPSec Keying Modules.

If it shows running, right-click on it and select Restart.
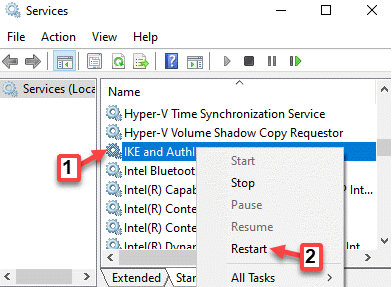
 

Services Right Side Name Ike And Authip Ipsec Keying Modules Right Click Restart


Step 4: Now, double-click on it and in the Properties window, under the General tab, go to the Startup type section.

Set the field to Automatic.

Press Apply and then OK to save changes and exit.
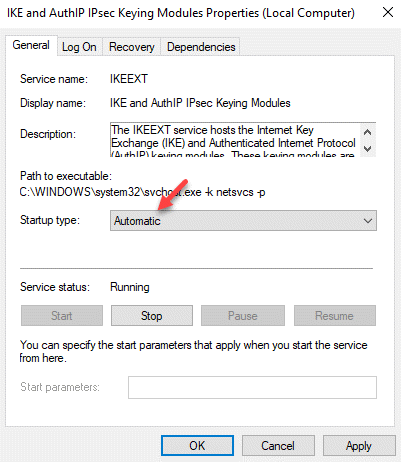
 

Properties General Startup Type Automatic Apply Ok


Step 5: Repeat Steps 3 and 4 for IPSec Policy Agent service.
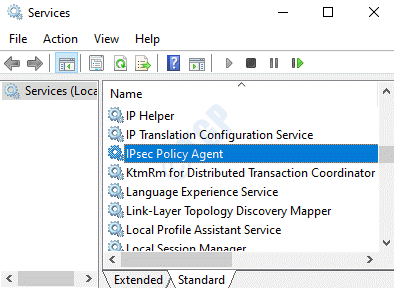
 

Services Name Ipsec Policy Agent


Now, restart your VPN connection and it should start working fine now.


Method 5: By Reinstalling the Network Adapter


Step 1: Right-click on Start menu and select Run. This will open the Run command window.


Start Right Click Run


Step 2: In the Run command box, type devmgmt.msc and hit Enter.
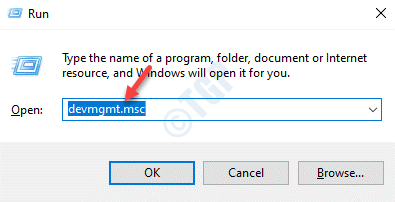
 

Run Command Devmgmt.msc Enter


Step 3: In the Device Manager window that opens, navigate to Network adapters and expand the section.

Locate the network adapter for your VPN, right-click on it and select Uninstall device.
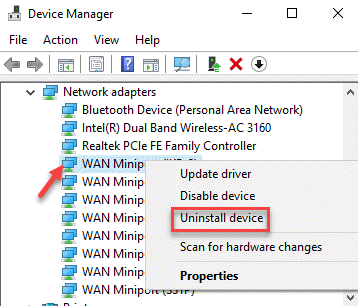


Device Manager Network Adapters Vpn Adapter Right Click Uninstall Device


Step 4: In the prompt that appears, click on the Uninstall button to confirm the action.


Once uninstalled, restart your PC. The device gets reinstalled automatically and gets reset to its default settings.


You must also check that proper certificate is being used for both the client and the server. Make sure that PSK (Pre Shared Key) if used, is the same and is configured for both the client and the VPN server.

Monday, March 22, 2021

window 10 experience with domain server 2012


 As my experience window 10 .

Clone window 10 for join the domain you need to know some point .

1.sysprep (c:\windows\system32\sysprep)

2.computer name (computer properties)

3.ip address 

Share printer on window 10 as the Server Printer.

you need to edit regedit.

window+run->regedit

HKEY_CURRENT_USER>Software>Microsoft>Window NT> Currentversion>Windows.

Right-Click on Windows folder and select Permissions.After add Everyone  user to full control.

Clone window 10

For clone window 10 you can use many ways as your experience like 

  1. Norton Ghost
  2. Partition Assistant Technical.
  3. AOMEI software.

https://t.me/c/1151998416/20


Automaticall lock computer after inactivity

Automatically Lock computer after inactivity


You have 5 ways using which you can auto-lock your Windows 10 computer after inactivity:

  1. Using built-in Dynamic Lock
  2. Using Screensaver settings
  3. Using Group Policy
  4. Using the Registry method
  5. Using a third-party tool.

Let us take a look at these methods.1] Using built-in Dynamic Lock

Dynamic Lock in Windows 10

Dynamic Lock helps you lock Windows 10 automatically when you step away. It locks down the Windows 10 computer automatically by using your mobile. But your mobile phone has to be connected all the time to your computer via Bluetooth. In other words, when you step away from your computer with your mobile, your computer will lock itself down. Butt may not work properly if your computer doesn’t support the Windows Hello function.

2] Using Screensaver settings

lock computer after inactivity in Windows 10

Well, if you would like to do this, the procedure is pretty simple and hasn’t changed since the last few iterations of Windows OS.

To make your Windows 10 computer ask for a password after a period of inactivity, type screen saver in the taskbar search and click on the Change screen saver result which appears.

The Screen Saver Settings box will open.

Here, under Wait – minutes – On resume, display logon screen settings, select the time after which you want Windows to ask for a password, and check the On resume, display logon screen box.

Click on Apply and exit.

If you have set the time at 10, then after 10 minutes of inactivity, you will be asked to enter your password, to be able to access your PC.

If you do not want a screen saver to be displayed, select None. If you wish to display it, you can select one. This setting is just above the “Wait …” setting.

Open Group Policy Editor and navigate to the following setting:

Computer Configuration > Windows Settings > Security Settings > Local Policies > Security Options.

Double-click on Interactive Logon: Machine inactivity limit setting.

Windows notices inactivity of a logon session, and if the amount of inactive time exceeds the inactivity limit, then the screen saver will run, locking the session.

Give it a value between 1 and 599940 seconds, save, and exit.

4] Using the Registry method

InactivityTimeoutSecs

Open Registry Editor and navigate to the following key:

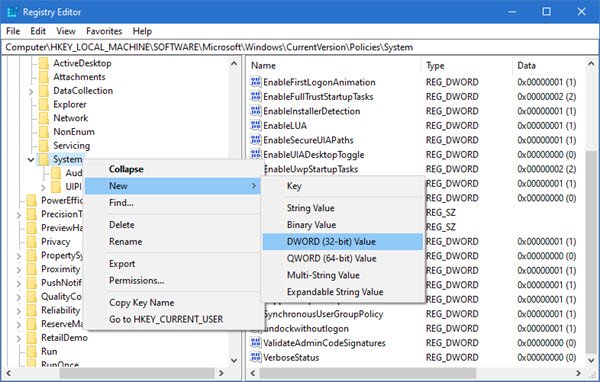
HKEY_LOCAL_MACHINE\SOFTWARE\Microsoft\Windows\CurrentVersion\Policies\System

Create a new DWORD value, name it InactivityTimeoutSecs, select the Decimal option, and enter the number of seconds (between 1 and 599940) in the field.

Click OK and exit.

5]  Using a third-party tool

Smart PC Locker Pro Power Saving

Smart PC Locker Pro is a free tool that lets you easily lock your Windows computer. It offers several configuration options.

Friday, February 7, 2020

How to protect ransomware,malware attack your PC ?


បច្ចុប្បន្នមានការវាយប្រហារដោយ ransomeware គ្រប់ប្រភេទដែលត្រូវបានបង្កើតឡើងក្នុងគោលបំណងផ្សេងៗទាញយកផលប្រយោជន៍ ដូច WannaCry ransomware ដែលបានកើតឡើង កាលពីឆ្នាំ២០១៧  ហើយធ្វើឲ្យពិភពលោកព្រួយបារម្ភ និងខាតប្រាក់រាប់លានដុល្លា ។វាត្រូវបានគេប៉ាន់ស្មានថាបានឆ្លងជាង ១៥០ ប្រទេស  និង ជាង ២០០០០០ ម៉ាស៊ីន។
សំនួរសួរថា ​តើយើងអាចការពារ ransomeware នេះបានដោយរបៀបណា?
ដើម្បីអាចការពារបាន  យើងមានវិធីដូចខាងក្រោម៖
១.Window pc គួរតែ update patch security អោយបានទៀងទាត់ពីMicrosoft .
២.ប្រើប្រាស់ antivirus ដែលមាន License ត្រឹមត្រូវ ដូចជា  MalwareByte,Kaspersky,Avast,Bitdefender,Eset,Avira ជាដើម.
៣.ប្រើប្រាស់ Anti rassomeware program   ដូចជា malwarebyte anti ransomewae,kaspersky anti ransomeware.

មួយរឿងទៀតដែលយើងត្រូវយល់ដឹង គឺ Hacker Exploit  PC ដោយផ្ទាល់រួច run ransomeware នៅលើម៉ាស៊ីនរបស់អ្នកផ្ទាល់តែម្តងនោះគឺ EternalBlue (Cyberattack exploit) Develop by the U.S National Security Agency(NSA).បន្ទាប់មកវាត្រូវគេរកចន្លោះប្រហោងឃើញដោយ Shadow Broker hacker Group នៅខែមេសា ​ថ្ងៃទី ១៤ ឆ្នាំ ២០១៧ .មួយខែក្រោយមក Microsoft ក៏បញ្ចេញ Patches Security for vulnerability.

Link  for Vulnerability.
http://www.catalog.update.microsoft.com/Search.aspx?q=KB4012214
https://portal.msrc.microsoft.com/en-US/security-guidance/advisory/CVE-2017-0143

ចំណុចនេះសំខាន់ណាស់ប្រសិនអ្នកមិនបាន Update Window នោះឳកាសនៃការឆ្លង ransomware មានកម្រិតខ្ពស់ណាស់ទោះមានAntivirus ក៏ទប់មិនឈ្នះដែរ។

បទពិសោធន៍នៃការឆ្លងតាមរយៈ EternalBlue Attack លើ Window PC  និង  Server.
I have use window server 2012 standard.below is a picture that alert error  when it attack after server that no Antivirus  no Update  restart and alert message error different that cause us  to difficult to solve this.
តើខ្ញុំធ្វើការដោះស្រាយដោយរបៀបណា?
យើងដឹងហើយថា computer  និង  server របស់យើងបានឆ្លងvirus ហើយ ចំពោះវីធីដោះស្រាយគឺមានច្រើនរបៀបណាស់។ប៉ុន្តែអ្វីដែលអ្នកត្រូវដឹង តើវាមកពីណា  ដោយរបៀបណា  ហើយPC  និមួយៗមានAntivirus អ្វីខ្លះ? ចំណុចមួយដែលខ្ញុំជួបគឺ  រាល់ PC ដែលinstall Antivirus AVG free  and Eset Not32  មិនមានបញ្ហាគ្រាន់តែបង្ហាញថាមាន  Message  Error ហើយមាន Attacker បន្ទាប់មកវា  Block Connection.ប៉ុន្តែចំពោះ ​Antivirus 360 របស់ចិនវិញ  Computer ទៅជា Blue Screen នេះបង្ហាញថា ៣៦០ របស់ចិនប្រើមិនកើតទេ  ហើយវាទាញ កម្មវិធីផ្សេងៗចូលPC ដោយមិនដឹងខ្លួន.

រឿងដែលយើងត្រូវធ្វើបន្ទាប់គឺ Patch Security all PC by version of Window 7,8,10,server 2012,server 2012 r2.
ចំពោះ ​Patch Security We Can find link below:

https://tiago.deretti.net/wannacrypt/
https://www.catalog.update.microsoft.com/

ចំពោះ
window server 2012 (kb4012214,4012217,4015551,4019216)
https://drive.google.com/open?id=1e43VimxWD66W-TmnEguU2IduqUA7DT4x

Window 7  service pack 1
https://drive.google.com/open?id=1tOUVx1m_UkvNfWbLbznSb5SkBVbSoAjI

Window 10
https://drive.google.com/open?id=1NauMKiJ1NfTkfkJPp3hV3ijjWxGJniS1

Window Xp Service pack 2
https://drive.google.com/open?id=1-3hOE1q0JQ2xRhcP5Zh42_3L63V4MbiH

Window Xp Service pack 3
https://drive.google.com/open?id=1OzG8WECpg8c29EAMHEI7TPq9pHz6Sqyq

Check Security by TrendMicro Support
https://drive.google.com/open?id=1alsne-lN3I6IyhsTuY3PjM3wIJ2GkftZ

Check by Script to Verified PC was patched or not
https://drive.google.com/open?id=1LaxMhEN-r4Tzyjuhy6QIPs0z6OIg7sSJ 

One more We can use Nmap application to check that too.
https://nmap.org/

cmd >C:\Program Files (x86)\Nmap\scripts\nmap -p445 --script smb-vuln-ms17-010  localhost